
Reading Time: 8 minutes
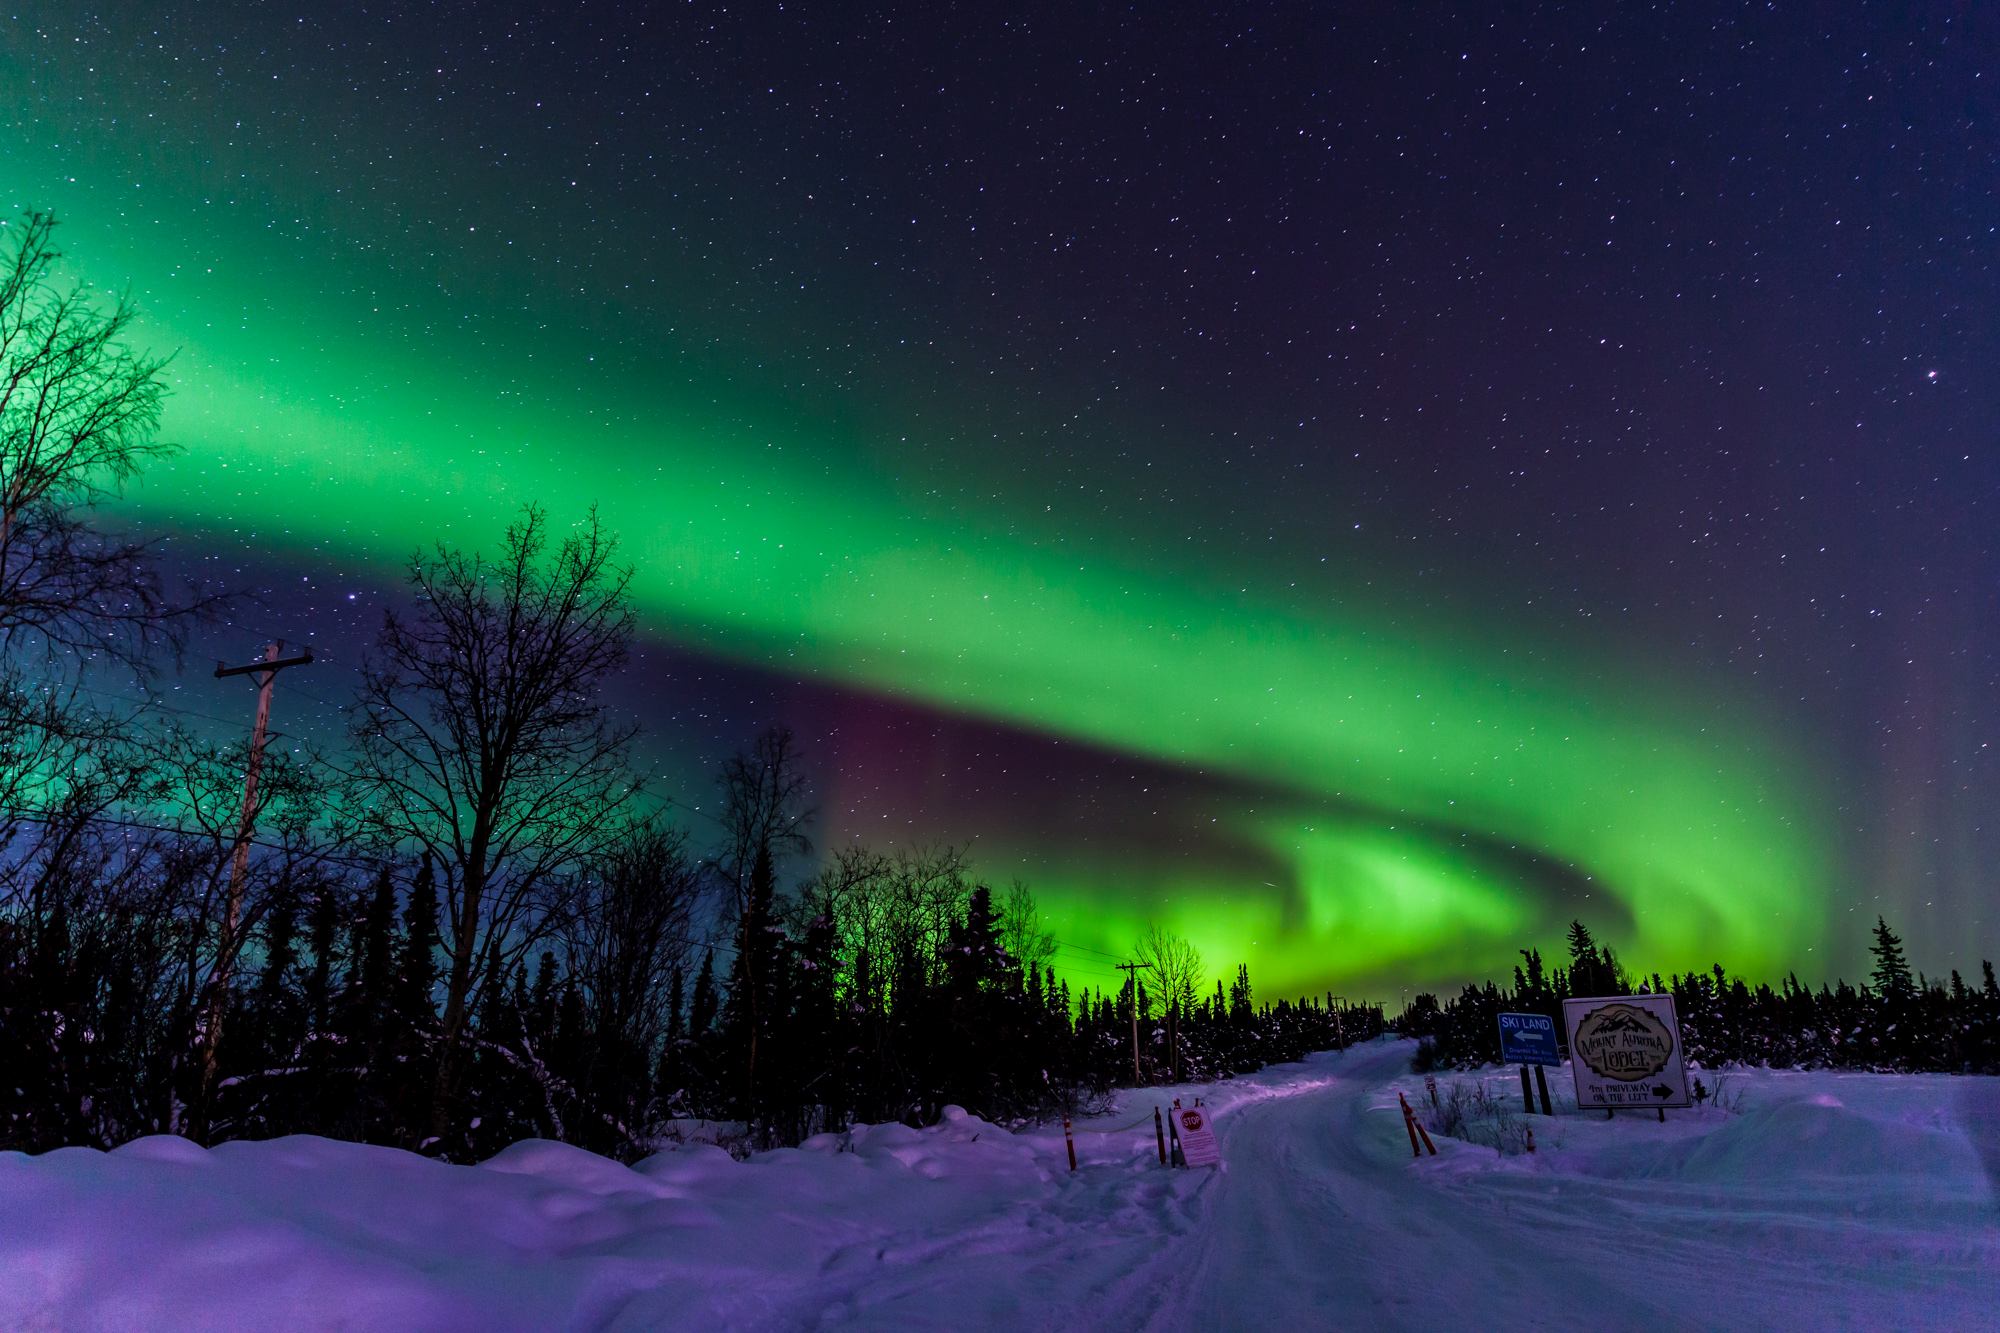
Photographing the Aurora Borealis, commonly known as the “Northern Lights” was on my list for a very long time. Just recently I made it up to Alaska, one of the best spots in the U.S. to spot the northern lights. I got incredibly lucky as the weather was perfect, at least one of the two nights I spent there.
With this guide I want to help you to take pictures of the Northern Lights as well. It is actually quite easy to photograph the Northern lights if they are out. The harder part is to get to a location where you can actually see them.
Location
There are many locations across the globe where you can see the northern lights. But as the name already suggests, you must be very far up north. Well, the southern hemisphere would work too, during the wintertime in the southern hemisphere. Logistically it’s easier for most people to get somewhere far north.
Some countries are famous for the northern lights like Iceland, Finland, Sweden, Norway, Canada, and parts of the United States. Alaska is the place to go to if you want to stay in the United States. The best and easiest place to get to in Alaska to see the Northern Lights is Fairbanks. To be able to see the Northern Lights you need to be away from the city and light pollution. These areas are called “Dark Skies”. It depends on the intensity of the aurora. If it’s a very intense aurora, you can even see it from the city.
During some very rare and heavy geomagnetic storms, the Aurora can be seen as far south as Florida. But this is rather rare and your best chances are very high up north.
Dark Skies
To find dark skies you have to get away from the cities and their light pollution. There are many services who can help you to find dark skies and even tell you the different levels of dark skies.
I personally use the PlanIt for Photographers app, which is available on Android and iOS.
There are also websites like Darksitefinder.com. Here you can also find location recommendations.
These are just a few examples. There are so many more apps and websites out there, with different functionalities and of course price ranges.
Moon Phase
To photograph the Aurora you want dark skies and the moon can negatively impact your photos. It all depends on how active the Aurora is. If it is a super active aurora, you can even shoot during full moon as you can see the Aurora in the city as well. Most of the time you want to make sure that the moon phase is at quarter moon or less. The moon position in relation to the aurora is also of interest. While a bit of moon light helps to put some light on the foreground, you always have to see the current condition and location.
My favorite photo planning app, PlanIt, helps you to figure out these variables. It can show you the current moon phase, rising and set hours as well as the position throughout the day and night. A super useful tool.
Weather
Another important factor is the weather at the location you are trying to shoot the Aurora. You want a clear sky for best viewing conditions. If there are a few clouds or thin clouds, you can still get photos of the Aurora but if it is totaly overcast, you might see a glow in the clouds if it is a very active Aurora.
There are a few tools which can help you with that.
Most of these websites also have a smartphone app available. PlanIt also has a Windy.com integration now and you can see pretty much the same data as the free website shows.
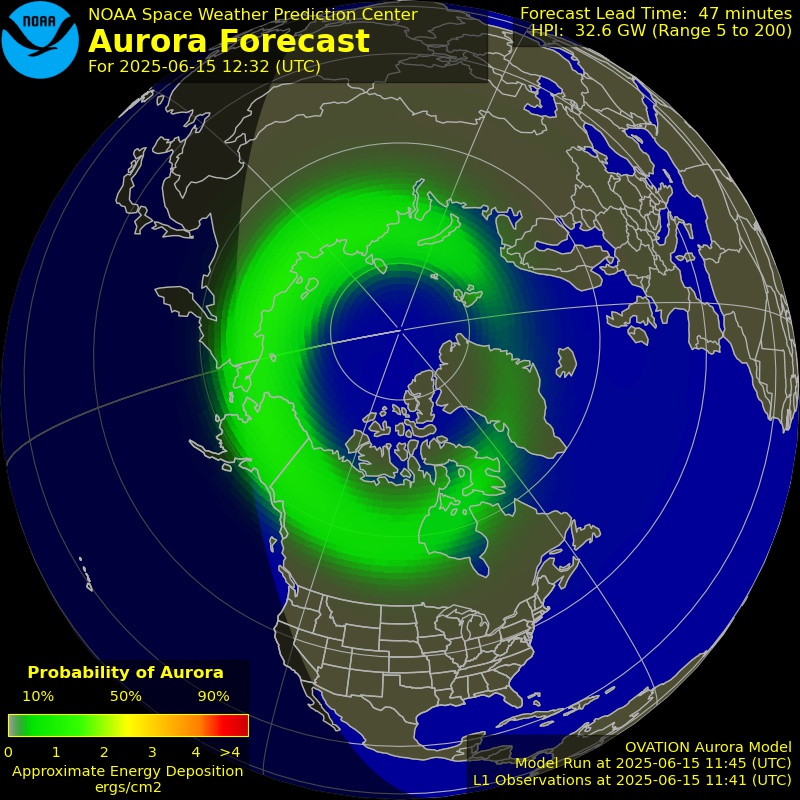
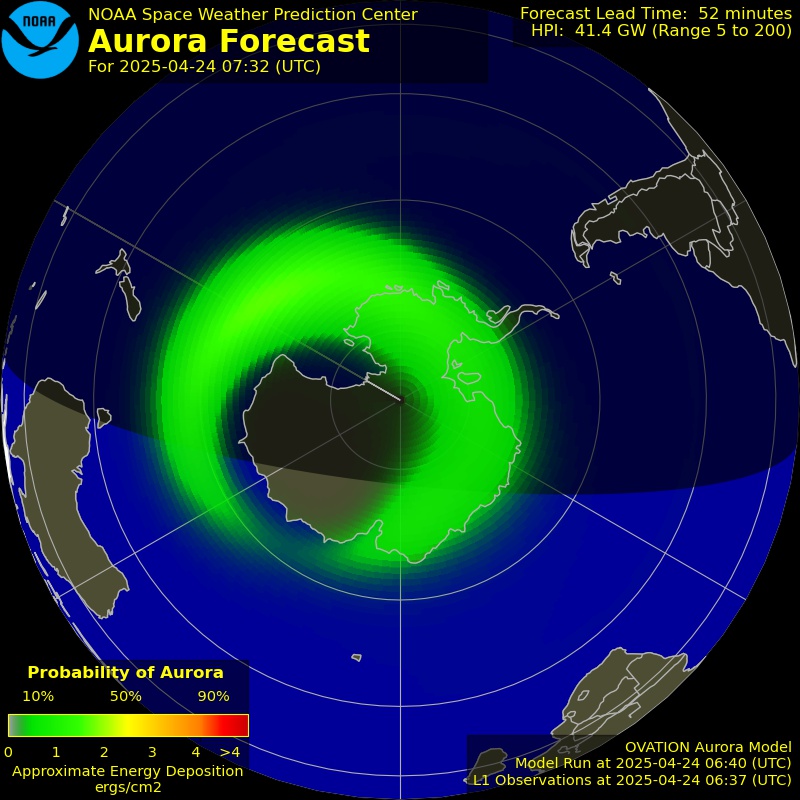
Space Weather
Besides dark skies you also need the right space weather. The Northern Lights are caused by solar winds which cause disturbances in Earth’s magnetosphere. More about it on Wikipedia.
A great and easy to understand website is the Aurora Dashboard of NOAA. It gives you a reliable source of information about the aurora forecast. Also check out the 30 Minute Aurora Forecast.
Be aware: The times are in UTC, and you must do the offset for the time zone you live in.
UTC Calculator
Kp-Index
Many websites and apps base the whole prediction of the Aurora only on the Kp index. This is a number between 0 and 9. The higher the number the more likely to get an Aurora but there is more to it.
It also depends on the strength of the magnetic field in relation to Earth’s magnetic field. This would be the Bz value. There are many more factors involved in the whole prediction of the Aurora. Even NOAA bases there prediction mainly on the Kp Index.
Check out this website for all the up to date information to better predict it yourself.
Equipment
You need a camera which allows manual control of all the settings. Most cameras nowadays have a manual mode where you can adjust all your settings. You also want to make sure you are familiar with your camera and how to set different settings like aperture, exposure and ISO in manual mode.
In general, you want a wide-angle lens. As you want to capture as much as possible of this amazing spectacular in the sky. Of course, there are different ways of composition. I used a 24mm lens but that was the widest one I had. You can go even wider like 14mm or 16mm. It all depends on what you have in mind and what you want to achieve.
You also want to make sure you use a fast lens. f/2.8 or faster is great. The wider you can open the aperture, the more light you can capture. This also helps you in avoiding star trails when doing longer exposures.
To take sharp images you need a sturdy tripod. You want to make sure that the camera is not shaking when you hit the shutter button. A shutter release cable can also help with this. The tripod should be good enough to hold your camera stable without shaking even if there is a little bit of wind.
If it comes to the tripod head, use what you are familiar with and already have. You don’t have to spend extra on fancy gear. I took my pictures with a regular ball head on my tripod. The Northern Lights are very easy to frame as you shoot a wide angle anyway.
Besides the already mentioned essential gear, consider bringing the following.
- Remote Shutter Release: This helps to avoid shaking when taking pictures.
- Lens Heater: Helps to keep the front element of your lens fog and ice free. Especially helpful in very cold conditions. You can use simple handwarmers and strap it to your lens with a rubber band or a zip-tie. There are also electric lens heaters available which can be plugged in to a USB power bank.
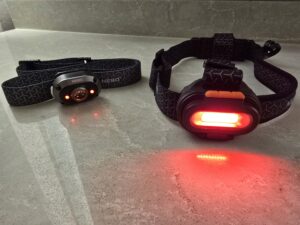
- Headlamp: Preferable with a red light for better night vision. Alternatively, a flashlight.
- Warm clothing: It will be most likely very cold and even windy. Make sure you dress appropriately and dress in layers.
- Camping Chair: Sit back, relax and enjoy the show.
- Warm Drinks like coffee or tea and some snacks.
Settings
It will be dark and even the best cameras will have problems focusing in almost total darkness. Set your focus to manual and pre-focus before you shoot. You can do this during the day and focus on an object far away at the horizon and lock your focus. You just need to be careful to not bump your focus ring or tape it down.
Alternatively modern cameras have tools which can help you to focus like focus peaking or focus assist. Focus peaking will color the parts of your image which are in focus. I selected the color red as it sets itself apart from the dark sky and white stars.
Alternatively you can just try to focus on bright object in the distance. I was able to do this successfully with my old DSLR with car lights far far away, or city lights, some stars or even the moon when somewhat visible. It is best to practice on how to focus at night so that you are ready once you head outside to your location. Also you want to be quick and efficient with your time as you might have to remove your gloves to accurately operate your camera.
The best mode to be in is Manual mode to shoot the northern lights. In this mode you can control all the settings individually. If you are not familiar in shooting in manual mode, you might want to practice beforehand to figure out on how to set all the different parameters like ISO, Aperture, and Exposure Time.
In rare occasions you have to switch to Bulb mode if you want to take long exposures beyond 30 seconds. Check your camera first. But normally these long exposures are rather rare. You might use it to create a separate image of the foreground to blend it together later in post production.
Open your aperture as wide as possible to let in as much light as possible. A wide-open aperture will also help to capture the light of the stars in the sky better. Lenses with an aperture of f/2.8 or better are preferred.
This depends on how active the Aurora is. If you have a fast-moving or very bright aurora you want a shorter exposure time. e.g. 3-8 seconds.
For a dimmer aurora or slow-moving aurora, you have to step up your exposure time to 15 or 20 seconds. Also keep in mind your foreground, if any, to expose for that one as well. Depending on the dynamic range of the scene you might have to do two exposures, one for the foreground and one for the sky and aurora and blend it later on in post processing.
500 Rule
Keep the 500 rule in mind if you want to avoid star trails. The 500 rule gives you the maximum exposure time before you start to see star trails.
Divide 500 by your focal length. This is the maximum time in seconds you should set to avoid star trails. I recommend you stay well below the calculated time. If you try to avoid star trails but your exposure time needs to be greater than the calculated value, increase your ISO. But be careful, higher ISO will cause more noise in the picture.
For example if you have a focal length of 24mm you need to divide 500 by 24.
500/24=20.83
That means you shouldn’t exposure you image for more than 20 seconds to avoid star trails. This is just a guideline. Try to stay well below the 20 seconds. Be aware that your calculation is different if you have a crop sensor. You will need to multiply the focal length with the crop factor (usually 1.5 or 1.6) to get your number.
Example with crop factor 1.6
500/(24×1.6)=500/38.4=13.02 seconds
A good starting point for your ISO setting is 800. But this also depends on your lens. If you have a very fast lens like f/2.8 or even f/1.4 you can set your ISO lower. If your lens isn’t as fast, you need to increase your ISO. Be also aware of the above mentioned 500 rule to avoid star trails.
Always shoot in RAW. By doing that you have more freedom in post processing to adjust your image and get it to look its best. RAW files are unedited files of all the information the sensor captures. If you shoot JPEG, you will lose image quality as the camera will do some of the editing for you as well as compressing the information.
If you decide to shoot in JPG, set your color space to Adobe RGB rather than sRGB. Adobe RGB has a wider color gamut compared to sRGB which helps to capture more of the spectrum of the aurora, especially the green colors…
Depending on your camera model and settings you can also use the following settings.
- Self-Timer: This will start a countdown on the camera before it takes a picture. Very useful if you don’t have a shutter release cable and want to avoid shaking the camera while pressing the shutter button.
- Mirror Lockup: Another setting on DSLRs which will minimize shaking. Great in combination with the self-timer. As the camera will lock up the mirror first and then countdown to avoid vibrations of the mirror.
- Long Exposure Noise Reduction: Turn OFF this setting as it can have negative effect on image quality and also your shooting process. With this feature on, the camera will take another exposure to eliminate hot pixels and noise, but during that time, you can’t shoot anything else. Many photo editing software like Adobe Lightroom have excelent noise reduction features now.
Conclusion
Above settings are just a guideline. It always depends on what you want to achieve. Do you just want to capture the Aurora in the sky and nothing else? Do you want to bring a foreground element in like a building, tree,…? It’s all up to you. Experiment with the settings and your gear and see what gives you the best results.
Peter is an award-winning photographer who travels all over the world to capture the beauty of our planet as well as the achievements of humanity. Follow Peter on his travel blog Gate to Adventures for more amazing places to go and explore.


